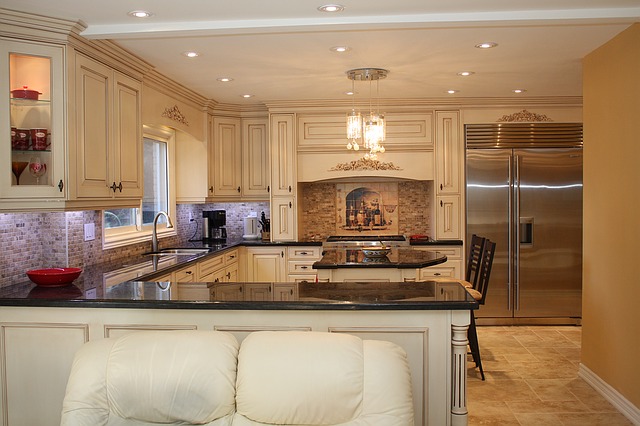
1. REDESIGN THE KITCHEN.

While renovating a kitchen, start little from the beginning. Supplant the kitchen spigot, add new cupboard equipment, and supplant old light installations with present day, energy-productive choices.

Rather than supplanting cupboards, paint the cupboards another shading or recruit a refacing organization to resurface the bureau boxes and put in new bureau entryways, drawers, and equipment. These little updates will work on the general look of your kitchen.

2. UPDATE THE APPLIANCES.

Assuming your machines don’t coordinate, consider requesting new entryways and face boards from the producer. This will give your kitchen a stronger look without the significant expenses of supplanting the machines.

Consider supplanting more established machines with new energy-effective models, which are better for the climate and utilize less energy.

3. SUPPORT THE BATHROOMS.

Washroom rebuilds will recover 87.7 to 93.5 percent of your venture, as per the Cost versus Esteem Report. Like the kitchen, don’t go off the deep end. Put in new installations, light up the room with paint, and yet again grout the bath. Another mirror and light installations can without much of a stretch change the vibe of a washroom.

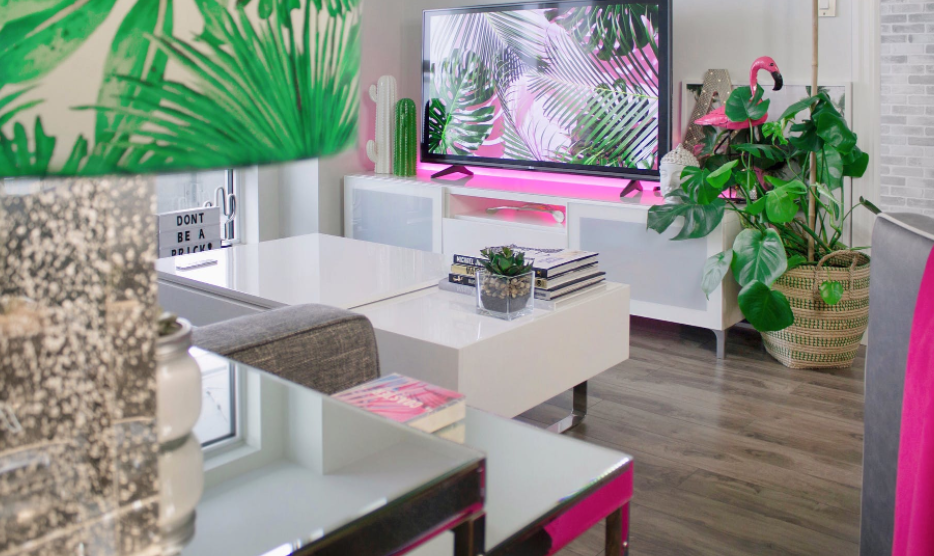
4. REDESIGN THE ATTIC OR BASEMENT.

Adding area to your home can rapidly raise and wind up costing more than initially planned. Rather than attempting to add on, redesign the current space in your home. Envision the loft as another room or an exercise region. Convert the cellar into a family room. The more flexible the room, the more allure for potential purchasers who can customize the space.

 5. SUPPORT CURB APPEAL.

Initial feelings count. Upgrading your home’s control allure can be just about as basic as scouring your home’s siding or as complex as adding another walkway. It shouldn’t be costly to be successful.

Introducing another front entryway is a quick, reasonable approach to in a flash further develop your home’s appearance.

Long life 

The parts of a LED and the way that they create light altogether broaden the life expectancy of these bulbs. Where other bulbs’ life expectancies are abbreviated through both legitimate and ill-advised utilization, the LED bulb’s low hotness levels, toughness, and energy effectiveness make it workable for it to outlive different kinds of bulbs by large number of hours. 

2. Energy proficiency 

In view of their high lumen yield per watt, LEDs are equipped for transforming around 70% of their energy into light. This makes them substantially more proficient than different bulbs, which squander a ton of energy by transforming it into heat. It just takes a 6 watt LED bulb to create the measure of light that a 40-watt glowing does, and their lower temperature likewise makes them more secure to work. 

3. High splendor and force 

LEDs are equipped for radiating a very undeniable degree of splendor. That is the reason wattage is at this point not a suitable estimation of brilliance – all things considered, check out a bulb’s lumen yield when you’re doing the change to LEDs or other energy-productive lighting. 

4. Low transmitted hotness 

While a glowing bulb works by warming its fiber to a temperature that produces light, a LED bulb transmits electromagnetic energy as light when jolted. By transforming energy into light rather than heat (instead of utilizing hotness to create light), LEDs can work at an essentially lower temperature than different kinds of lights. 

A kitchen is more than just a stunning backsplash and beautiful cabinets. If you are remodeling your kitchen, here are some tips you can follow. Shout out to our favorite Gilbert Painting company for these remodeling tips.

Plan Walkways 

Ways all through and ought to be somewhere around 36 inches wide. Ways inside the cooking zone ought to be 42 inches wide for a one-cook kitchen and 48 inches wide for a two-cook arrangement. When arranging, change and landmasses likewise. 

Track down the right hot for microwave 

The best tallness and area for a relies upon the culinary specialist and the level of child cordiality wanted in the . For grown-ups, 15 creeps above ledge level is a decent microwave tallness. For youngsters, an underneath ledge arrangement may be more secure and more appropriate. 

Avoid corners 

So make cupboard and machine entryways completely useful, plan space for the entryway’s freedom and swing heading in your plan. Avoid corners, and ensure entryways will not slam against one another if open simultaneously. 

Have a ledge 

When planning your , permit 15 creeps of ledge on each side of a cooktop and cooler. Landing space is likewise significant close to the microwave.

15. Envision how fast your morning schedule would be if your garments were coordinated, with shoes and frill. You can redo a storage room to your definite details with wire racking units and a couple of instruments. We’ll tell you the best way to introduce wire wardrobe racking to tackle pretty much any capacity issue. 

Start by estimating your space. Start with the range from the floor to the roof. Then, measure the length of your usable divider space — both the back divider and any side dividers. At last, measure the profundity of your wardrobe. 

Whenever you’re finished arranging, prep your wardrobe for the new establishment. Eliminate your old wardrobe framework and fix the dividers if necessary. You might have to apply spackling compound, sand and prepare. This is likewise the ideal chance to paint. At the point when the paint is dry, utilize a stud locator to find the divider studs, and delicately mark the divider where you’ll hang the unit. 

Wire frameworks are not difficult to introduce. Utilizing your arrangement as an aide, mark a level line and join the holder rail to the studs. Ensure it’s level as you secure it. 

Presently associate the uprights to the holder rail. Ensure they’re plumb — which means straight here and there. Secure them at the base with screws. 

On the off chance that the uprights aren’t in accordance with the studs, use divider secures. Imprint the spot and drill a pilot opening. Introduce a divider anchor and afterward drive the screw in. 

The establishment from here is straightforward. Lock in the rack sections on the uprights and afterward adjust the racks properly. Append the bar snares, cap the bar finishes and snap in the holder pole. 

Wrap up by introducing flexible frill. The following are a couple of alternatives: 

Shoe racks can be made by flipping around a rack piece (lip pointed upwards). Clasps connect the racking to the divider and an extraordinary section holds the rack at a point. There are additionally extraordinary extras accessible that are intended for shoe stockpiling. 

Corners can be made two different ways. You can utilize an exceptionally formed corner piece that connects to racks on one or the other side with joiner plates. You can likewise utilize two straight retires — one consummation at the divider and the other closure at the edge of the primary rack — appended to one another with a corner support connector. Fit the help under the wires of one rack and over the wires of the other. 

Drawers and bushels can be added utilizing sprinter outlines (for a long time) or hanging cabinet coasts (to mount a solitary cabinet under a rack). Pre-arranged sprinter outline units are accessible, or you can tweak an edge and cabinet blend.

Homes worked with plaster siding are exceptionally famous in warm, dry environments. They are exceptionally normal in the Southwest, including Arizona thus. The benefit of working with plaster is that it can keep going for quite a long time with the appropriate consideration and support. 

Plaster is a material made of concrete, water, and sand. Plaster is applied wet and solidifies to an extremely thick strong. It is utilized as a brightening covering for dividers and roofs, outer structure siding, and as a sculptural and imaginative material in design. 

Inadequate Curing. At the point when plaster is at first applied, it needs an ideal opportunity to dry and fix. Relieving extricates the abundance lime in the plaster. On the off chance that this cycle is hurried, the surface will start to disintegrate and decay rapidly. Permit somewhere around 60 days for this progression; more if the climate is abnormally wet. 

Disregarding Necessary Repairs. Plaster will break and the paint will strip. The breaks and openings should be filled prior to painting. Something else, water can enter, even through paint, causing more harm and even shape to develop behind the surface. 

Inadequate Cleaning. This misstep is valid for most surface composition. Paint will not cling as expected to messy surfaces..The paint will rapidly start to piece and strip. Strain washing will eliminate the vast majority of the soil and grime. One significant note: If you’ve fixed the plaster, permit it to dry for something like 15-30 days prior to washing. 

Painting on Wet Stucco. Once more, you shouldn’t paint any surface that is wet, however plaster is particularly permeable. That implies it requires some investment to dry, so try to delay up to that point to apply your first layer of paint. Allow each coat to dry totally prior to applying the following one. 

Ill-advised Painting Techniques. Plaster can be painted utilizing a roller or with an airless sprayer. Brushes are normally not suggested with the exception of detail work. The airless sprayer makes bigger activities simpler. A roller turns out great for more modest positions 

Not Hiring a Professional. Painting plaster is interesting and requires explicit skill to get the best outcomes. Choosing to paint it yourself might deliver not exactly palatable outcomes. Additionally, recruiting some unacceptable painter can be a misstep. Not all painters are capable in painting plaster. That is the reason you need to employ an expert who has information and involvement in plaster surfaces. 

Kitchen remodeling and designing are more than just coming up with a good design and putting it into practice. The designer will usually ask some questions to gain some knowledge about the lifestyle of the family living in the house, so the kitchen can be redesigned accordingly. What is important is to also give some time to plan your kitchen. This planning includes figuring out what type of kitchen you want and what material you want it made from. The color will also play an important factor in your choice of materials.

Kitchen Countertops are usually made from Laminates, Granite or Solid Surface. These types of materials come in different colors and patterns to choose from. They also come in different price ranges as well. If you can afford it, Laminate is the least expensive material for kitchen counter tops and has a variety of color choices as well as an almost endless amount of patterns. The downside to laminate is that it cannot be repaired easily and damaged areas usually require replacing the entire counter top.

Granite countertops are more expensive than laminates but they give your home a lot of class and elegance and there is nothing like them when it comes to durability. It can last for years without showing any damage or wear marks. Granite can also be repaired easily and damaged parts can be replaced very quickly and without spending a lot of money. However, the downside of this type if countertops is that there are limited color choices and it cannot be used for large areas because the granite slab will cost too much.

Solid Surface is another good choice for kitchen counter top materials. It has many benefits such as durability and resistance to heat, chemicals and scratches among others. This material comes in different colors as well as patterns but it is more expensive than laminates or granite. Another downside to this material is that although it resists stains, liquids may penetrate into the material which makes maintenance very difficult.

Concrete countertops also becoming popular for kitchens these days. Not only because of its beauty and durability but also because of the wide array of concrete mixes that can be used to suit different preferences. Some prefer a smooth or polished surface while others like it rough or with texture. Concrete is the perfect material for the eco-friendly kitchen as well since it is durable and affordable and can be produced locally using recycled materials such as cement, aggregate and polymers.

Much consideration should also go into what type of cabinets you want your kitchen remodeling project to have. You usually have three choices: Traditional, Frameless, and European style cabinets. The traditional cabinet features panel doors that are attached directly to the face frame which is mounted on carcass boxes. This type of cabinet comes in a variety of colors, patterns, and materials.

The Frameless cabinets are more modern in style, they don’t use the face frame as traditional cabinets do. Instead, they have self-closing hinges that attach to the carcass boxes at the back of the cabinet. This type is also quite popular among homeowners because it has a clean look that makes it suitable for large kitchen areas or kitchens with larger appliances. The downside to this type is that only soft close door hinges can be used so if you prefer hard close hinges, this may not be the right choice for you since it will damage your cabinet doors in time.